Nine Easy Steps to Install Magento and Start Your E-Commerce Website..
1.Install the WAMP server.
2.Download the Megento from the Megento Downloadable website.
3.Download the Megento sample data from the Megento Download website.
4.Create a DataBase like Megento.as below followed.
How to install Magento with sample data
Many people find it easier to get used to Magento when there is some preinstalled data to begin with. This way people can see how exactly their categories and products are organized, how their store is configured, how their frontend would look like with some products on it, etc. Fortunately, Magento has a sample data package that can be installed and used with every new installation.
The Magento sample data package contains a MySQL dump with some sample products and CMS pages and a media folder containing the images for the sample products. The MySQL dump has to be imported into an empty database and the contents of the media should be uploaded to the media folder of your Magento installation.
Important: Sample data can be imported only into an empty database, you cannot import it into an existing Magento database because you will break your store! In other words, installing Magento sample data can be done only for new Magento installations, not for existing ones!
To install the sample data, you need to create a new MySQL database and add a user to it. HostKnox customers can do this from the Databases section of the Pixie control panel. Note that this database will be later used for the whole Magento installation.
Next you need to download the Sample Data archive. You can do this from the download section of the Magento website.
Once you download the archive, extract it on your computer. All files from the Sample Data archive will be extracted to a folder called magento-sample-data-<version>, where <version> will be the latest sample data version, e.g. magento-sample-data-1.2.0. This folder will contain a MySQL dump calledmagento_sample_data_for_1.2.0.sql (the version will depend on the Sample Data version you downloaded) and a folder called media.
Let's import the MySQL dump into the newly-created database. For this purpose you need to open phpMyAdmin and click on the database you just created. In our case the database is calleddemo_magento:

To import the MySQL dump, you need to go to the Import section of phpMyAdmin by clicking the Importtab:

Once there, click the Browse button and locate the magento_sample_data_for_1.2.0.sql file on your computer. Double-click it to set it for importing and then click the Go button on the bottom right part of the page to import it. Once the import completes, you will see a confirmation message and lots of tables in your database:

Now that the sample MySQL dump has been imported, the only thing left is to copy the contents of the sample media folder to the media folder located in your Magento installation directory and proceed with the Magento installation. For detailed instructions on how to install Magento, please check our Magento installation tutorial
Note that in order for your sample products to show properly on your store's frontend, you need to reindex your data through the Magento Index Management section in your admin area.
5.Import the .sql folder by the same time it takes to few minutes to import files.
6.After importing files find the Megento-sample-Data folder and go to
Megento-sample-Data
↓
Media
↓
Catalog.
Then copy these files and paste inside
Megento (which we created/installed).
↓
Media.
7.In the megento folder we need to find the varien.php file and open with editor and comment the below code.( From line 96 to line 113).
/* $cookieParams = array(
'lifetime' => $cookie->getLifetime(),
'path' => $cookie->getPath(),
'domain' => $cookie->getConfigDomain(),
'secure' => $cookie->isSecure(),
'httponly' => $cookie->getHttponly()
);
if (!$cookieParams['httponly']) {
unset($cookieParams['httponly']);
if (!$cookieParams['secure']) {
unset($cookieParams['secure']);
if (!$cookieParams['domain'] ) {
unset($cookieParams['domain']);
}
}
} */
to avoid the access problem in the future.becuase in cookies the default user details will be stored.if we comment this code it won’t give any access problems.
8.Go to browser abd type the localhost/Megento.(which we created the file name).
9.Install the Megento as per the intructions.as below followed
The instructions here are for a basic Magento installation with no sample data. If you want to have some sample products and pages in your Magento, you need to install the Magento Sample Data first. Instructions on how to install the sample data are available in our Magento Sample Data Installation Tutorial.
Before you begin the installation, you need to create a new MySQL database and add a user to it. HostKnox customers can do this from the Databases section of the Pixie control panel.
(If you have created a database as part of the Magento Sample Data Installation Tutorial, you must skip the database creation and use the database with the sample data for the Magento installation.)
Next you need to download the latest stable Magento version. You can do this from the download section of the Magento official website.
Once you download the archive, extract it on your computer. All files will be extracted to a folder calledmagento. You need to upload this folder to the public_html folder of your hosting account. You can upload it using your favorite FTP client (e.g. FileZilla). If you complete the installation from this folder, your Magento store will be accessible through www.yourdomain.com/magento.
We, however, will rename this folder to store so that your Magento store will be accessible throughwww.yourdomain.com/store. This is in fact the URL you need to open in your browser in order to begin the installation. When you open it, you will see this page:

Once you read the license agreement, tick I agree to the above terms and conditions. and then clickContinue to proceed. The next page is for Localization settings:

Modify them to match your locale and click Continue to go to the next page - Configuration. Here you will set the database, web access and session storage options for the installation:

Let's review each configuration section in more details:
Let's review each configuration section in more details:
• Database Connection
o Host - the detault is localhost and in 99% of the cases you won't have to change it
o Database Name - the MySQL database you created earlier; in our case this is demo_magento
o User Name - the MySQL user you created earlier; in our case this is demo_magento
o User Password - the password for the MySQL user you created earlier
o Tables Prefix - defines a prefix for the database tables; this is optional and you can safely leave it blank
• Web access options
o Base URL - the URL for your store; usually it is automatically detected and you won't have to change it
o Admin Path - the path to your store's administrative panel; the default is admin but you can change it to your preference
o Enable Charts - if enabled, charts with various data will be displayed on your admin Dashboard; this is ticked by default and we'll leave it this way
o Skip Base URL Validation Before the Next Step - more often than not installations fail if this is not ticked, so we recommend that you tick it; it will not affect the functionality of your store
o Use Web Server (Apache) Rewrites - if enabled, your URLs will be rewritten for better search engine optimization; it requires Apache mod_rewrite to be enabled on the server; it is recommended that you tick this setting
o Use Secure URLs (SSL) - tick this setting if you have a private SSL certificate installed; this way your customers will be redirected to a secure connection (HTTPS) when they have to submit sensitive information through your store; for production sites, a private SSL certificate is a must; however, since we are building a demo store only for the purposes of this tutorial, we'll leave this unchecked
• Session Storage Options
o Save Session Data In - sessions storage location; the default (and recommended) option isFile System
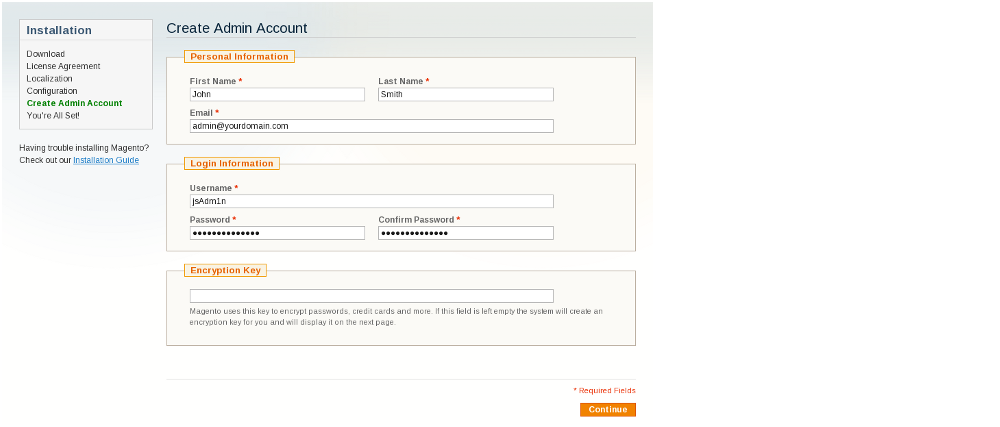
When you are ready with all configuration settings, click Continue to go to the next page - Create Admin Account:

In the Personal Information section you should enter your First and Last Name, as well as your Email.
In the Login Information section you should enter the Username and Password you want to use for accessing your Magento administrative panel. Avoid using admin as username. Instead, set a more complex username, preferably a combination of letters and numbers. For your password, use a complex string of small and capital letters, numbers and special characters.
For example ..write username as root and password as root1234.
Do not neglect the above recommendations. Your store's security is of the utmost importance. Setting your admin login details as "admin" and a simple phrase or dictionary word for password will significantly decrease the security of your site!
The last section - Encryption Key - is for the Magento encryption key which is used for encrypting sensitive information such as passwords and credit card details. You can either enter a key to your preference, or, as we'll do here, leave the field blank and let Magento generate the key for us. It will be displayed on the final page of the installation. Click Continue to go there.
This is the last page of the Magento installation wizard. If you've made it this far, you're all set:

The only thing left to do to start using your Magento eCommerce is write down your encryption key. Then you can visit Magento's Frontend and Backend and start managing your online store.
Article By www.ScriptoGraphics.com . A Magento eCommerce Web Development Company